Tips for Photographing Backyard Birds
Photographing backyard birds is extremely fun and rewarding, although very challenging! I've been seriously photographing my backyard birds for the past five years, and I'm still as obsessed with it as I was in the beginning. I have taken thousands of birds photos, many of which you can see in my photography albums. And I've learned a few things along the way so I thought I'd share with those of you who also enjoy photographing birds in your backyard and at your feeders. I hope you enjoy these backyard bird photography tips.
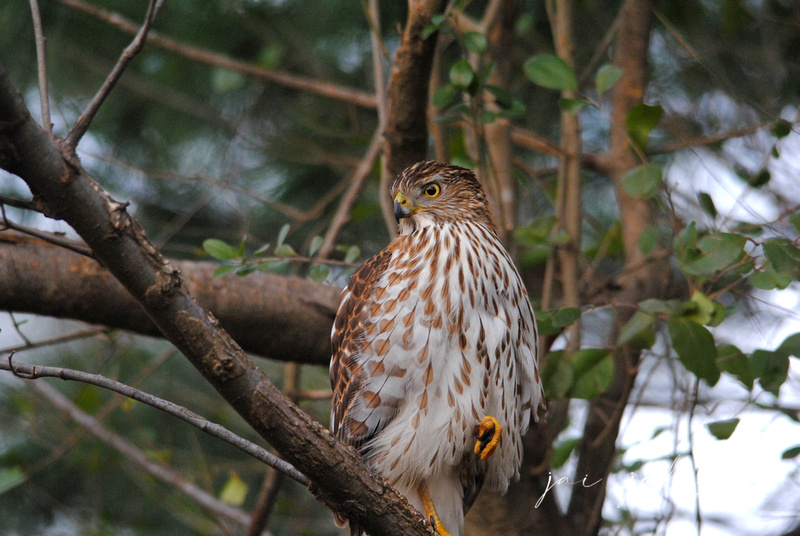
Tip #1: Get the biggest and best telephoto lens you can afford. And then...get as close to your birds as you can. Bird are definitely skittish and if you move too fast to get close to them, they'll dart off in a second. The smaller the bird, the faster they move. I position my lens and get the bird in focus, and then take one step at a time to get closer, shooting photos the entire way. I don't wait until I get close enough to get a shot, because that bird can exit the scene in a heartbeat. By shooting photos as I go, I can at least capture the bird's photo at some points along the way. With the hawk shown above, I started shooting about 100 feet away. Taking one step at a time with my lens on him the whole way, I shot a progression of photos from far away until I reached the point above, which was about 15 feet away from him. He didn't seem scared of me at all - the only reason he flew after this shot is because one of my cats ran through the walkway between the trees underneath him. Below is another example where I was super close to the bird for the shot.
Tip #2: Don't speak. Be very, very quiet. Birds - especially small ones - get startled easily by noises, and it's best to be doing this at a time when things are quiet around you. When your neighbor is mowing the lawn or using a leaf blower is not the time to be photographing your birds. Before you start your photography session, check out your surrounding environment for loud noises, equipment running, and even barking dogs close by, as these noises will startle your birds, and you'll end up getting frustrated from missing the shots. And for goodness sake, put your cell phone on vibrate or shut it off. There's nothing more aggravating than getting all set up for the perfect bird shot and to have your photo start ringing (or playing music!) from your pocket. Unless your birds are used to phone and music sounds, you can kiss that shot goodbye when the phone is in action.
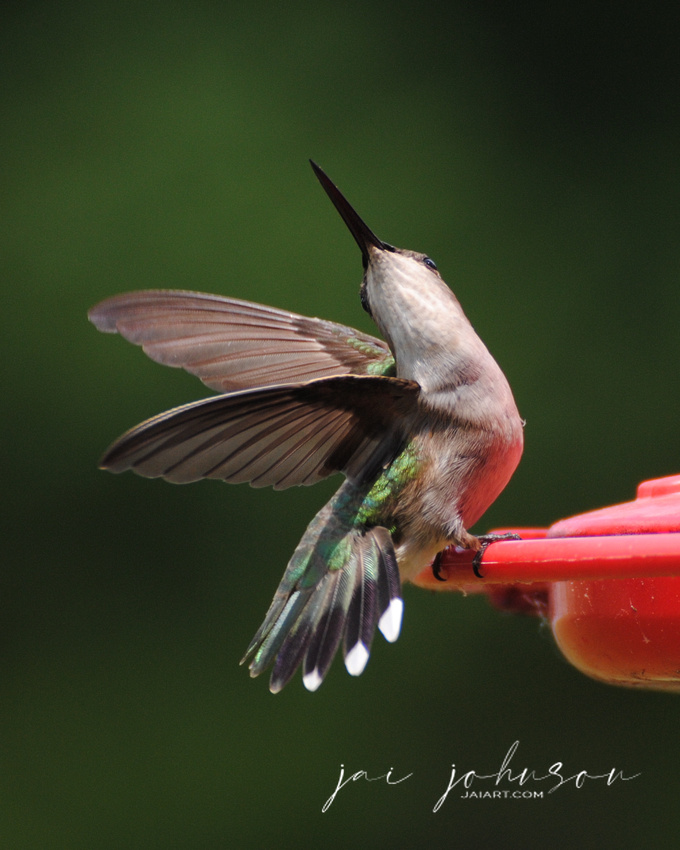
Tip #3: Pay attention to your backgrounds. If your birds are on a branch of a filled out tree, you'll most likely capture the leaves behind the bird in clear or semi-clear focus, which can create a busy background. (which isn't bad as long as it's pretty!) If you want a softer background which is blurred, position your feeders at quite a distance in front of any background material. Referring back to the hummingbird photo above, this feeder is right outside a screened porch on a house. In my first photos, I was actually shooting the feeder with the edge of the porch in the background, which showed a strip of wood and some screen behind the bird. YUCK. By shifting myself to where I was standing against the porch and photographing towards the big open backyard instead, I was able to get a much better background which blurred beautifully! Below is a photo of another hummingbird with a feeder positioned directly in front of a bush. It's still a good photo, but the one above gives the viewer a clear focus of the bird and makes the bird really stand out, therefore, I prefer it.
Tip #4: Pay attention to your perches. I will photograph birds on feeders, but I typically prefer them to be on a branch nearby. My feeders are positioned in a small cove of trees and bushes, giving my birds plenty of places to land other than on the feeders for photos. If you watch your birds and learn their habits, you can determine such things as when they're approaching or leaving the feeder, which branch they will perch upon. You can also figure out how long a bird will stay on the feeder. For instance, I've learned the little Tufted Titmouse (shown below) is a very fast, hyper little bird. He will move from branch to branch very quickly before he ever lights on the feeder, and he's only on the feeder for a second to grab a seed before he leaves. When he leaves, however, he takes his seed to a nearby branch and breaks it open and sits on the branch for a short time after eating. THIS is the time to get the photo.
Tip#5: Pay attention to your light and sky. If you have a bright sky showing behind your bird, you could end up with a silhouette photo, as the bird will be too dark. Or the bird will not stand out clearly enough against the background of the sky. However, if the sunlight is shining on your bird, you'll be able to get a better photo. The experts often say to not photograph things in direct sunlight -- however because there is often sky showing behind birds, I feel it helps in those cases. Plus the sun will really bring out the beautiful colors in the feathers which you might not otherwise capture. Below is a photo of my red shouldered hawk up high on a branch, with no sun shining on him.
Now here is a photo in the same location once the sun came out and illuminated him slightly:
His colors really glow in the second photo! Use the sun to your advantage. I always watch for how bright my sky is behind the subject, and for what light is on the bird. I will even check out nearby branches to see what their background is and whether the sun is hitting them or not, and once I find a branch or portion of a tree I'm happy with, I'll wait for a bird to land on that particular branch before I shoot anything. Below is a more extreme example. The first photo turned out to be a silhouette because of incorrect lighting (sun behind the subject).
In this second photo, the flying hawk was bathed in sunlight (sun in front of the subject):
Tip #6: Be patient. Anytime you approach your feeder area, or another area you often see birds, they will fly away. Find a spot to stand or sit and just WAIT. My songbirds often make a mass exodus upon me getting into position. But after 10-15 minutes of me sitting there quietly waiting, they will come back, and they usually ignore me. My daughter is impatient with birds -- she'll go outside with her camera and if the birds fly away as she approaches, she'll wait a minute or so and give up. With birds, you can't do that. They have to learn you're not going to hurt them -- and they often learn that within 15 minutes or so. Don't chase the birds around - unless you want some extra exercise. :) Find a spot and wait for them to come to the area. When I photographed the hawk above, I was leaning against the side wall of a neighbor's house for probably 30 minutes before she showed up. I just quietly waited. In the cold. With a heavy lens positioned and ready. Which brings me to my next tip.
Tip #7: Holding the lens can be difficult, but with practice, you'll get it figured out. Some people prefer to use a tripod. I don't. I want to be free to follow my birds easily. Whether than means panning the lens around the area, or getting up and moving to another location, I want to be able to easily move. Many of the photos shown in this blog post were taken with a Tamron 70-300mm lens. This lens is fairly lightweight for a telephoto, but definitely heavier than a kit lens. The lens I'm currently using is a Sigma 150-500mm. The very first hawk photo shown in this post was taken with the Sigma, which is a much heavier lens. Since I don't have any photos of how I hold the lens, I'm going to attempt to describe it. I hold the lens as a hunter would hold his rifle. I am right handed, so this perspective is how I, as a right handed person, holds the lens. I hold the right edge of the camera body with my right hand and use my right forefinger to press the shutter. I put my left hand - palm up - about midway under the lens to stabilize it. Then I bring my left elbow as tightly into the middle of my chest as I can and I squeeze my right elbow inward as well. And I hold my breath while I shoot, to try to avoid camera shake. I often will space my feet far apart to brace myself further. If I have a wall of a house or building to lean up against, I utilize that as well. I also have a portable camping chair I'll sit in near my feeding area. I hold the lens in the same way as I'm sitting.
Tip #8: What to wear. And what not to wear. Wear comfortable clothes, suited for the weather. You don't want to get all situated in your favorite spot to only have to get up and go change or add clothing...figure this out beforehand. I've done it numerous times...gone outside and settled myself only to realize that breeze was just a little chilly and I needed to go get a jacket. It's frustrating to have to get up -- which makes the birds who've arrived all fly away -- and have to come back out and start the waiting process all over again. Wear neutral colored clothing, such as greens, grays, browns, blue and blacks. Stay away from bright colors. Unless you're photographing hummingbirds. Hummingbirds love red and if you wear a red shirt, they will often fly right up to you. Don't wear perfume, cologne, hair spray or other extra smelly stuff. Birds have a keen sense of smell and you want to blend in as best as possible in order that you can get close to your feathered friends. Strong smelling perfumes and colognes will keep them away. But those scents WILL draw bees and other irritating bugs. As will the bright colored clothes. So if you want birds, but not the bees and bugs, wear bland colored clothing and don't wear perfume.
Tip #9: Photograph your bird from all directions. Birds are moving constantly. When they land on a branch, they'll look straight ahead, to the left, to the right, and then turn around and look over their backside, all in a matter of seconds. Get photos of all of it! This way, you can pick your best photo from a multitude of choices. I can't tell you how often I've photographed a male cardinal with a black face, thinking I've obtained a great shot, only to see his face was too dark in the final photo. By shooting when he looks left AND right, if one side is too dark, the other will often come out more to my liking.
Tip #10: Always focus on the eye. This is true of any living creature. I sell my photos in a variety of venues, and I can tell you the ones which sell the most are the ones in which the eye of the bird or animal is clearly in focus. Your viewers want to feel like they can "know" your bird, as if they're right there with him. This happens through the connection made via the eyes. Also, always look for the white glint in the eye. This brings more life to your bird and his expression, and it's definitely appealing to viewers. When editing your final bird photos, if you need to, enhance that white glint in his eye. Or if it's a great photo but the glint isn't there, consider adding it via your editing program. It will bring your photo to life.
--Jai
Keywords:
backyard,
backyard bird photography,
backyard bird photography tips,
birds,
how to photograph birds,
photographing birds
Comments
Jai, these are all great tips and I employ a number of them. One additional thing I do is hang small branches from my rain gutters. The small birds will land on the branches and perch until they feel it is safe to fly to the nearby feeders.
When they land on the "perches" I am about 15 feet away with my 80-400 lens and the sun at my back. The grassy hill behind the house makes for a pleasant out-of-focus green background. I sometimes spend a couple of hours in the early morning shooting birds this way.
No comments posted.
Loading...
|